Collaborative Github Workflow
From eqqon
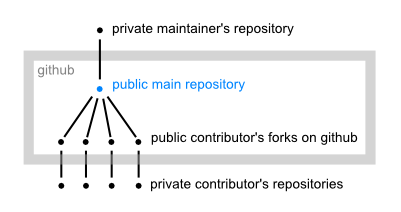
Typical distributed setup of git repositories for collaboration on a github hosted project. The dots are repositories, the lines between them indicate that one repository has been cloned from another. The forks are initially created by cloning from the main repository and the private repos are clones from the public ones on github.
Collaboration on Github is not complicated but also not intuitively clear for beginners because not all parts of the workflow are incorporated into the Github user interface. This description describes the structure of collaboration between the contributors and the maintainers of a project that is hosted on github. For every step in the workflow the respective git commands are given for reference.
The example
This description uses the project GitSharp as example. Git# is the CSharp implementation of git on Windows and Mono.
The main repository also called the upstream branch is henon/GitSharp. The maintainers of this repository are responsible of merging in contributor's commits.
Contributor's Workflow
Getting Started
- Short version
- Fork
- Install tools like git itself (if not yet done)
- Clone
- Start coding ;)
- Fork
Say you want to start contributing to a project on github. The first thing to do is to fork it on github. Forking is the preferred way of collaboration on github and it works quite well with git. Just follow the instructions on github. Now you should have your own public repository which contains exactly the same history as the main repository at the time you forked. You will later push your contributions into this repository and the maintainers of the main repository will pull your commits into the main branch.
- Install Git Tools
.... work in progress ..... going to complete it in the next days.
